
Hiking in and around Yosemite
Hiking - Easy
*** Bridalveil Fall Trail Closure ***
The trail to Bridalveil Fall is closed due to the Bridalveil Fall Rehabilitation Project.
Trail Overview
Distance: 0.5 mi (0.8 km) round trip
Elevation gain: Approximately 80 ft (24 m)
Difficulty: Easy
Time: 20 minutes
Begin at: Bridalveil Fall Parking Area
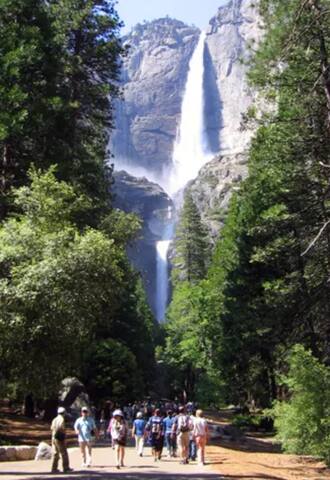
Plunging 620 feet (189 meters), Bridalveil Fall is often the first waterfall you'll see when entering Yosemite Valley. In spring, it thunders; during the rest of the year, look for its characteristic light, swaying flow. A paved trail leads from the parking area to the base of this waterfall, which flows year-round. Although paved, this is trail is not wheelchair accessible due to its grade.
Seasonality
The trail to Bridalveil Fall is open year-round. When the water is at its peak in spring and early summer, you can expect to get wet! In some cases the spray is so strong, you may not even be able to easily access the end of the trail. Expect icy and very slick conditions in winter.
Bridalveil Fall Trail map and profile
Stay Safe
The rocks and boulders above the viewing platform are slippery even when dry; stay safe by staying on the paved trail. Scrambling off trail in this area has led to serious injuries.
If you choose to park along Southside Drive, when getting out of your vehicle, watch for traffic and be cautious opening car doors and crossing the road.
Water
Drinking water is not available at the trailhead, base of the waterfall, or parking area.
Restrooms
Restrooms are available in the parking area.
Parking
Parking is available at the trailhead, accessible from the Wawona Road (continuation of Highway 41) or Southside Drive. The parking area often fills up quickly in summer and, while there is a lot of turnover, traffic jams are common when getting in and out of this parking lot. Another option is to drive a little further east on Southside Drive into Yosemite Valley (a few hundred yards), where you'll find parking on either side of the road with a different trail option. This trail is a bit longer—an additional 0.25 miles (0.4 km), crosses Bridalveil Creek, and showcases different views of Bridalveil Fall as you approach the main parking area.
Transportation
Shuttle service is not available to the Bridalveil Fall area. Drive your own car to the trailhead (or take a long hike using the Valley Loop Trail).
Trail Etiquette
Leashed pets are allowed on this trail. Keep your food within arm's reach at all times and do not feed the wildlife. Carry out all trash and food waste (fruit peels, shells, etc.).
16 polecane przez mieszkańców
Bridalveil Falls
Brideveil Falls Trail*** Bridalveil Fall Trail Closure ***
The trail to Bridalveil Fall is closed due to the Bridalveil Fall Rehabilitation Project.
Trail Overview
Distance: 0.5 mi (0.8 km) round trip
Elevation gain: Approximately 80 ft (24 m)
Difficulty: Easy
Time: 20 minutes
Begin at: Bridalveil Fall Parking Area
Plunging 620 feet (189 meters), Bridalveil Fall is often the first waterfall you'll see when entering Yosemite Valley. In spring, it thunders; during the rest of the year, look for its characteristic light, swaying flow. A paved trail leads from the parking area to the base of this waterfall, which flows year-round. Although paved, this is trail is not wheelchair accessible due to its grade.
Seasonality
The trail to Bridalveil Fall is open year-round. When the water is at its peak in spring and early summer, you can expect to get wet! In some cases the spray is so strong, you may not even be able to easily access the end of the trail. Expect icy and very slick conditions in winter.
Bridalveil Fall Trail map and profile
Stay Safe
The rocks and boulders above the viewing platform are slippery even when dry; stay safe by staying on the paved trail. Scrambling off trail in this area has led to serious injuries.
If you choose to park along Southside Drive, when getting out of your vehicle, watch for traffic and be cautious opening car doors and crossing the road.
Water
Drinking water is not available at the trailhead, base of the waterfall, or parking area.
Restrooms
Restrooms are available in the parking area.
Parking
Parking is available at the trailhead, accessible from the Wawona Road (continuation of Highway 41) or Southside Drive. The parking area often fills up quickly in summer and, while there is a lot of turnover, traffic jams are common when getting in and out of this parking lot. Another option is to drive a little further east on Southside Drive into Yosemite Valley (a few hundred yards), where you'll find parking on either side of the road with a different trail option. This trail is a bit longer—an additional 0.25 miles (0.4 km), crosses Bridalveil Creek, and showcases different views of Bridalveil Fall as you approach the main parking area.
Transportation
Shuttle service is not available to the Bridalveil Fall area. Drive your own car to the trailhead (or take a long hike using the Valley Loop Trail).
Trail Etiquette
Leashed pets are allowed on this trail. Keep your food within arm's reach at all times and do not feed the wildlife. Carry out all trash and food waste (fruit peels, shells, etc.).
Trail Overview
Distance: 1 mile (1.6 km) loop
Elevation gain: Approximately 50 ft (15 m)
Difficulty: Easy
Time: 30 minutes
Begin at: Lower Yosemite Fall Trailhead (shuttle stop #6)
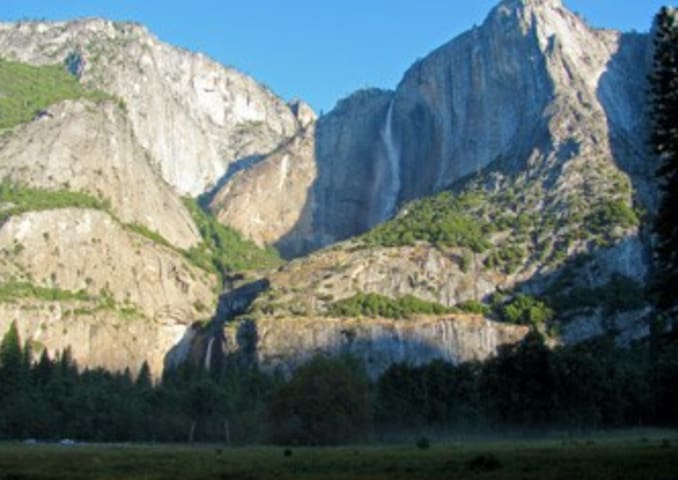
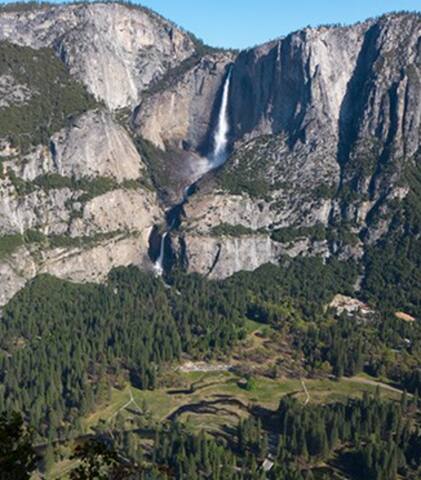
Part of North America's tallest waterfall, Lower Yosemite Fall is the final 320-foot (98-meter) drop. Deafening in spring and early summer when the waterfall peaks in volume, you can expect to get sprayed with water when standing on the footbridge near its base. This short, easy walk rewards with spectacular views of both Upper and Lower Yosemite Falls. This paved loop trail offers different vantage points of Yosemite Falls and Yosemite Creek, and you can stop at the many exhibits to learn more about the natural and cultural history of the area.
If walking from the Valley Visitor center, follow the bicycle path to shuttle stop #6 and begin the trail. Consider walking the loop in a clockwise direction for best views of Yosemite Falls. This eastern portion of this loop trail is wheelchair accessible (when not covered in ice or snow).
To learn more about this Yosemite icon, view a 10-minute video about Yosemite Falls.
Seasonality
The trail to Lower Yosemite Fall is open year-round. When the water is at its peak in spring and early summer, you can expect to get a little wet. This waterfall is often dry from late July or August through October. Expect icy conditions in some areas during the winter, especially on the short climb leading to the footbridge on the western trail.
Lower Yosemite Fall map and profile
Stay Safe
Stay on the paved trail. Above the wooden footbridge that crosses Yosemite Creek, the rocks and boulders are slippery even when dry. Scrambling off-trail in this area has led to serious injuries.
Water
A drinking fountain is available near the restrooms along the western trail. Drinking water is not available along the trail.
Restrooms
Restrooms are available along the western trail; no additional restrooms are available along the way.
Parking
Parking is not available at the trailhead. Parking is available at the Yosemite Village and Yosemite Falls parking areas.
Transportation
Ride the free Valley Visitor Shuttle (7 am to 10 pm, year-round) to shuttle stop #6 and follow the bicycle path in either direction to access both the western and eastern sections of this loop trail. Beginning the hike from the west offers full views of Yosemite Falls right from the start. You can also walk along the bicycle path from the Yosemite Valley Visitor Center—this adds approximately 0.5 miles (0.8 km) to your hike).
Trail Etiquette
Share the trail! Leashed pets and strollers are allowed. Bicycles are prohibited with numerous bicycle racks located nearby for your convenience. Keep your food within arm's reach at all times and do not feed the wildlife.
7 polecane przez mieszkańców
Lower Yosemite Fall Trail
Trail Overview
Distance: 1 mile (1.6 km) loop
Elevation gain: Approximately 50 ft (15 m)
Difficulty: Easy
Time: 30 minutes
Begin at: Lower Yosemite Fall Trailhead (shuttle stop #6)
Part of North America's tallest waterfall, Lower Yosemite Fall is the final 320-foot (98-meter) drop. Deafening in spring and early summer when the waterfall peaks in volume, you can expect to get sprayed with water when standing on the footbridge near its base. This short, easy walk rewards with spectacular views of both Upper and Lower Yosemite Falls. This paved loop trail offers different vantage points of Yosemite Falls and Yosemite Creek, and you can stop at the many exhibits to learn more about the natural and cultural history of the area.
If walking from the Valley Visitor center, follow the bicycle path to shuttle stop #6 and begin the trail. Consider walking the loop in a clockwise direction for best views of Yosemite Falls. This eastern portion of this loop trail is wheelchair accessible (when not covered in ice or snow).
To learn more about this Yosemite icon, view a 10-minute video about Yosemite Falls.
Seasonality
The trail to Lower Yosemite Fall is open year-round. When the water is at its peak in spring and early summer, you can expect to get a little wet. This waterfall is often dry from late July or August through October. Expect icy conditions in some areas during the winter, especially on the short climb leading to the footbridge on the western trail.
Lower Yosemite Fall map and profile
Stay Safe
Stay on the paved trail. Above the wooden footbridge that crosses Yosemite Creek, the rocks and boulders are slippery even when dry. Scrambling off-trail in this area has led to serious injuries.
Water
A drinking fountain is available near the restrooms along the western trail. Drinking water is not available along the trail.
Restrooms
Restrooms are available along the western trail; no additional restrooms are available along the way.
Parking
Parking is not available at the trailhead. Parking is available at the Yosemite Village and Yosemite Falls parking areas.
Transportation
Ride the free Valley Visitor Shuttle (7 am to 10 pm, year-round) to shuttle stop #6 and follow the bicycle path in either direction to access both the western and eastern sections of this loop trail. Beginning the hike from the west offers full views of Yosemite Falls right from the start. You can also walk along the bicycle path from the Yosemite Valley Visitor Center—this adds approximately 0.5 miles (0.8 km) to your hike).
Trail Etiquette
Share the trail! Leashed pets and strollers are allowed. Bicycles are prohibited with numerous bicycle racks located nearby for your convenience. Keep your food within arm's reach at all times and do not feed the wildlife.
Trail Overview
Distance: 1 mile (1.6 km) loop
Elevation gain: Flat
Difficulty: Easy
Time: 30 minutes
Begin at: Yosemite Valley Visitor Center (shuttle stop #5 or #9) Cook's Meadow is also accessible from shuttle stop #11 (near Sentinel Bridge) or shuttle stop #6 (Lower Yosemite Fall Trailhead)
This short, easy walk offers stunning views of Yosemite Falls, Half Dome, Glacier Point, and Sentinel Rock. From the visitor center, walk west along the bicycle path toward Lower Yosemite Fall. At shuttle stop #6, cross the street and follow the bike path, bearing left as the path forks. At Sentinel Bridge parking area (shuttle stop #11), walk out onto the bridge to enjoy a classic view of Half Dome before returning to the parking area. Follow the boardwalk back across the meadow, cross the two streets, and turn right to return to the visitor center.
You can just as easily walk this loop in reverse and can begin walking at the Yosemite Valley Visitor Center, heading west along the bike path until you come into view of the meadow where you will cross two streets and then enter Cook's Meadow shortly before the boardwalk starts.
This trail is wheelchair accessible (when not covered in snow).
Seasonality
The Cook's Meadow Trail is open year-round and is a great spot to visit no matter when you come to Yosemite as you are always rewarded with a great view. In winter, the path may be snow-covered or icy.
Map of Cook's Meadow Loop
Stay Safe
Boardwalks are slippery when wet and even more so when covered in snow or frost.
Water
Water is not available along the trail. A drinking fountain is located at the Yosemite Valley Visitor Center, where you may choose to end or start your walk. Additionally, a water fountain is available near the Lower Yosemite Fall restrooms.
Restrooms
Restrooms are not available along this walk. Restrooms are available at the Yosemite Valley Visitor Center, where you may choose to end or start your walk. Additionally, restrooms are available at the Lower Yosemite Fall area.
Parking
The nearest parking are the Yosemite Village and Yosemite Falls parking areas. Sentinel Bridge (shuttle stop #11) also has a small parking area, which is a midway point through this walk (and could work as a starting and ending point).
Transportation
You can begin this walk at the the Yosemite Valley Visitor Center, accessible by the Valley Visitor Shuttle (7 am to 10 pm year-round) at shuttle stop #5 and #9. From there, walk west along the bike path toward Lower Yosemite Fall. At shuttle stop #6, cross the street and follow the bike path. You can also begin this walk by taking the shuttle directly to stop #6. Additionally, the Cook's Meadow area is accessible from stop #11 at Sentinel Bridge.
Trail Etiquette
Share the trail! Leashed pets, bicycles, and strollers are allowed. Also, stay on the path. Do not venture out into the meadow, which causes trampling and damages the ecosystem, which is important to the many plants and animals that thrive in this fragile environment. Keep your food within arm's reach at all times and do not feed the wildlife. Carry out all trash and food waste (fruit peels, shells, etc.).
Cook's Meadow Loop
Cook's Meadow LoopTrail Overview
Distance: 1 mile (1.6 km) loop
Elevation gain: Flat
Difficulty: Easy
Time: 30 minutes
Begin at: Yosemite Valley Visitor Center (shuttle stop #5 or #9) Cook's Meadow is also accessible from shuttle stop #11 (near Sentinel Bridge) or shuttle stop #6 (Lower Yosemite Fall Trailhead)
This short, easy walk offers stunning views of Yosemite Falls, Half Dome, Glacier Point, and Sentinel Rock. From the visitor center, walk west along the bicycle path toward Lower Yosemite Fall. At shuttle stop #6, cross the street and follow the bike path, bearing left as the path forks. At Sentinel Bridge parking area (shuttle stop #11), walk out onto the bridge to enjoy a classic view of Half Dome before returning to the parking area. Follow the boardwalk back across the meadow, cross the two streets, and turn right to return to the visitor center.
You can just as easily walk this loop in reverse and can begin walking at the Yosemite Valley Visitor Center, heading west along the bike path until you come into view of the meadow where you will cross two streets and then enter Cook's Meadow shortly before the boardwalk starts.
This trail is wheelchair accessible (when not covered in snow).
Seasonality
The Cook's Meadow Trail is open year-round and is a great spot to visit no matter when you come to Yosemite as you are always rewarded with a great view. In winter, the path may be snow-covered or icy.
Map of Cook's Meadow Loop
Stay Safe
Boardwalks are slippery when wet and even more so when covered in snow or frost.
Water
Water is not available along the trail. A drinking fountain is located at the Yosemite Valley Visitor Center, where you may choose to end or start your walk. Additionally, a water fountain is available near the Lower Yosemite Fall restrooms.
Restrooms
Restrooms are not available along this walk. Restrooms are available at the Yosemite Valley Visitor Center, where you may choose to end or start your walk. Additionally, restrooms are available at the Lower Yosemite Fall area.
Parking
The nearest parking are the Yosemite Village and Yosemite Falls parking areas. Sentinel Bridge (shuttle stop #11) also has a small parking area, which is a midway point through this walk (and could work as a starting and ending point).
Transportation
You can begin this walk at the the Yosemite Valley Visitor Center, accessible by the Valley Visitor Shuttle (7 am to 10 pm year-round) at shuttle stop #5 and #9. From there, walk west along the bike path toward Lower Yosemite Fall. At shuttle stop #6, cross the street and follow the bike path. You can also begin this walk by taking the shuttle directly to stop #6. Additionally, the Cook's Meadow area is accessible from stop #11 at Sentinel Bridge.
Trail Etiquette
Share the trail! Leashed pets, bicycles, and strollers are allowed. Also, stay on the path. Do not venture out into the meadow, which causes trampling and damages the ecosystem, which is important to the many plants and animals that thrive in this fragile environment. Keep your food within arm's reach at all times and do not feed the wildlife. Carry out all trash and food waste (fruit peels, shells, etc.).
Hiking - Moderate
Distance: 2 miles (3.2 km) round trip to lake and back; 5 miles (8 km) loop around lake
Elevation: 100 feet
Difficulty: Easy to Moderate
Time: 1 hour round trip to the lake (end of paved trail); 2-3 hours for full loop
Begin at: Mirror Lake Trailhead (shuttle stop #17)
This trail begins at shuttle stop #17. The first mile of this trail is a paved service road that leads directly to Mirror Lake. You may access the loop trail from the end of the paved path. The loop follows Tenaya Creek beyond the lake, and crosses two bridges after the Snow Creek Trail junction before returning past Mirror Lake on the south side of Tenaya Canyon. (There is no safe access to the north side of Mirror Lake directly from the south side of the loop, except via bridges at the west and east ends of the trail).
Mirror Lake has little water much of the year and, while pleasant at any time of year, it is fullest in spring and early summer, when Tenaya Creek flows freely with fresh snowmelt. When water is calm, the lake offers beautiful reflections of surrounding cliffs. Exhibits along the trail tell the story of Mirror Lake's lake-to-meadow succession, and also highlight some of the cultural history of the area. Mirror Lake is often referred to as Mirror Meadow in late summer due to the lack of water and the influx of grasses and sandy areas.
Seasonality
This trail is open year-round. In winter it can be icy and snowy, especially along the south side of Tenaya Creek.
Mirror Lake and Tenaya Canyon Loop (clockwise profile)
Stay Safe
Be aware of slick conditions along the south side of this loop trail during winter and early spring. With few natural barriers to hold onto or to brace yourself, it is fairly easy to slip and fall. This section of trail often remains covered in snow and ice, even when the north side of the loop is snow-free. When winter conditions exist, consider making an out and back trip along the north side of the loop.
Stay on the trail! This is especially important during spring and early summer when water levels are highest. When hiking on the south side of the loop, hikers often spot what appears to be an easy way to rock-hop across Tenaya Creek, either just for fun, or as a way to shortcut the loop and rejoin the trail without doing the entire loop. While this crossing is only ankle deep at first, it quickly becomes thigh deep, and, all too often, hikers are swept into dangerous whitewater and pinned against rocks. Don’t be tempted to leave the trail, and always remember when approaching moving water to look at the conditions downstream.
Watch our preventive search and rescue/swiftwater videos to learn more about past experiences visitors had in this area of the park.
Water
Drinking water is not available at the trailhead or along the trail. Come prepared, and if you opt to extend your hike to travel the full Mirror Lake Loop or up the Snow Creek Trail, plan accordingly.
Restrooms
Vault toilets are available about 0.5 miles (0.8 km) from the trailhead and also 1 mile (1.6 km) from the trailhead at the end of the paved service road at Mirror Lake. There are no additional restrooms along the trail.
Parking
Parking is not available at the trailhead. The nearest parking area is at Curry Village, though you can easily access the trail by parking anywhere in eastern Yosemite Valley and taking the free shuttle (get off at shuttle stop #17).
Transportation
The Valley Visitor Shuttle (7 am to 10 pm year-round) serves the trailhead at shuttle stop #17. You can also bicycle the first mile of the trail to the end of the paved service road. From there, you can either turn around or park your bike and begin your hike.
Trail Etiquette
Leashed pets, bicycles, and strollers are allowed on the first paved mile of the trail. Beyond that, they are prohibited. Keep your food within arm's reach at all times and do not feed the wildlife. Carry out all trash and food waste (fruit peels, shells, etc.).
12 polecane przez mieszkańców
Mirror Lake Trail
Mirror Lake TrailDistance: 2 miles (3.2 km) round trip to lake and back; 5 miles (8 km) loop around lake
Elevation: 100 feet
Difficulty: Easy to Moderate
Time: 1 hour round trip to the lake (end of paved trail); 2-3 hours for full loop
Begin at: Mirror Lake Trailhead (shuttle stop #17)
This trail begins at shuttle stop #17. The first mile of this trail is a paved service road that leads directly to Mirror Lake. You may access the loop trail from the end of the paved path. The loop follows Tenaya Creek beyond the lake, and crosses two bridges after the Snow Creek Trail junction before returning past Mirror Lake on the south side of Tenaya Canyon. (There is no safe access to the north side of Mirror Lake directly from the south side of the loop, except via bridges at the west and east ends of the trail).
Mirror Lake has little water much of the year and, while pleasant at any time of year, it is fullest in spring and early summer, when Tenaya Creek flows freely with fresh snowmelt. When water is calm, the lake offers beautiful reflections of surrounding cliffs. Exhibits along the trail tell the story of Mirror Lake's lake-to-meadow succession, and also highlight some of the cultural history of the area. Mirror Lake is often referred to as Mirror Meadow in late summer due to the lack of water and the influx of grasses and sandy areas.
Seasonality
This trail is open year-round. In winter it can be icy and snowy, especially along the south side of Tenaya Creek.
Mirror Lake and Tenaya Canyon Loop (clockwise profile)
Stay Safe
Be aware of slick conditions along the south side of this loop trail during winter and early spring. With few natural barriers to hold onto or to brace yourself, it is fairly easy to slip and fall. This section of trail often remains covered in snow and ice, even when the north side of the loop is snow-free. When winter conditions exist, consider making an out and back trip along the north side of the loop.
Stay on the trail! This is especially important during spring and early summer when water levels are highest. When hiking on the south side of the loop, hikers often spot what appears to be an easy way to rock-hop across Tenaya Creek, either just for fun, or as a way to shortcut the loop and rejoin the trail without doing the entire loop. While this crossing is only ankle deep at first, it quickly becomes thigh deep, and, all too often, hikers are swept into dangerous whitewater and pinned against rocks. Don’t be tempted to leave the trail, and always remember when approaching moving water to look at the conditions downstream.
Watch our preventive search and rescue/swiftwater videos to learn more about past experiences visitors had in this area of the park.
Water
Drinking water is not available at the trailhead or along the trail. Come prepared, and if you opt to extend your hike to travel the full Mirror Lake Loop or up the Snow Creek Trail, plan accordingly.
Restrooms
Vault toilets are available about 0.5 miles (0.8 km) from the trailhead and also 1 mile (1.6 km) from the trailhead at the end of the paved service road at Mirror Lake. There are no additional restrooms along the trail.
Parking
Parking is not available at the trailhead. The nearest parking area is at Curry Village, though you can easily access the trail by parking anywhere in eastern Yosemite Valley and taking the free shuttle (get off at shuttle stop #17).
Transportation
The Valley Visitor Shuttle (7 am to 10 pm year-round) serves the trailhead at shuttle stop #17. You can also bicycle the first mile of the trail to the end of the paved service road. From there, you can either turn around or park your bike and begin your hike.
Trail Etiquette
Leashed pets, bicycles, and strollers are allowed on the first paved mile of the trail. Beyond that, they are prohibited. Keep your food within arm's reach at all times and do not feed the wildlife. Carry out all trash and food waste (fruit peels, shells, etc.).
Distance: 11.5 mi (18.5 km) full loop; 7.2 mi (11.6 km) half loop
Elevation gain: Mostly level
Difficulty: Moderate
Time: 5-7 hours full loop, 2.5-3.5 hours half loop
Begin at: Lower Yosemite Fall (shuttle stop #6) [head west along the bicycle path until you see signs for the Valley Loop Trail]
This trail follows many of the Valley's first east-west trails and wagon roads. It offers a rare opportunity in Yosemite Valley: to hike on a fairly level trail with some solitude. While some of the trail passes near roads, much of it takes you through meadows, talus slopes at the base of the granite cliffs, and near the Merced River. You can access the trail from many places throughout the Valley; however, the mileage and description used here starts at the Lower Yosemite Fall area (follow signs for Valley Loop Trail). Route-finding can be difficult in places, so it is best to bring a map with you (even a simple day hiking brochure from the visitor center) as it will orient you with the various landforms in the Valley, which are often listed on the trail/directional signs.
From the Lower Yosemite Fall area, head west along the base of the Three Brothers rock formation, past Camp 4, eventually working your way through Yosemite Valley to El Capitan. If you are planning to hike the half loop, cross the Merced River at El Capitan Bridge and continue by heading east back toward Yosemite Village. If you are planning to hike the full loop, continue west past El Capitan toward Bridalveil Fall. While most of the trail is flat, there are some hilly sections throughout the hike. Additionally, you will find mixed trail surfaces: dirt, rocks, sand, and old pavement.
Seasonality
The Valley Loop Trail is open year-round. During spring, you may find localized flooding on the trail near creeks. During winter, the trail is often snowy and icy in places, particularly along the south side of Yosemite Valley. In these areas, use extreme caution as it may be hard to get traction on ice and route-finding may be difficult in snowy areas (the trail may be completely obscured by just a few inches of snow).
Valley Floor Loop profile (counter-clockwise direction)
Stay Safe
Plan ahead; stay hydrated by carrying plenty of water as no drinking water is available along the trail.
Wear appropriate footwear for a long hike over varying terrain.
Water
Drinking water is not available along the trail. A drinking fountain is available at the start of the trail near the Lower Yosemite Fall Trailhead.
Restrooms
Restrooms are available at the trailhead near the start of the Lower Yosemite Fall Trail. Vault toilets are also available at the Bridalveil Fall parking area and Swinging Bridge Picnic Area.
Parking
Parking is not available at the trailhead; the trail begins at the Lower Yosemite Fall Trailhead (near shuttle stop #6). Primary parking is available at the Yosemite Village and Yosemite Falls parking areas. You can also access the trail from various roadside parking areas throughout Yosemite Valley.
Transportation
The Valley Visitor Shuttle (7 am to 10 pm year-round) serves this trailhead (stop #6). You can also walk from the Yosemite Village area along the bicycle path to get to the trailhead (this adds approximately 0.5 mile (0.8 km) to your hike). From May to October, the El Capitan Shuttle stops at the El Capitan Bridge (stop E4) and the Four Mile Trailhead (stop E5), should you need alternate transportation back.
Trail Etiquette
Pets, bicycles, and strollers are prohibited. Keep your food within arm's reach at all times and do not feed the wildlife. Carry out all trash and food waste (fruit peels, shells, etc.).
6 polecane przez mieszkańców
Yosemite Valley Loop Trail
Distance: 11.5 mi (18.5 km) full loop; 7.2 mi (11.6 km) half loop
Elevation gain: Mostly level
Difficulty: Moderate
Time: 5-7 hours full loop, 2.5-3.5 hours half loop
Begin at: Lower Yosemite Fall (shuttle stop #6) [head west along the bicycle path until you see signs for the Valley Loop Trail]
This trail follows many of the Valley's first east-west trails and wagon roads. It offers a rare opportunity in Yosemite Valley: to hike on a fairly level trail with some solitude. While some of the trail passes near roads, much of it takes you through meadows, talus slopes at the base of the granite cliffs, and near the Merced River. You can access the trail from many places throughout the Valley; however, the mileage and description used here starts at the Lower Yosemite Fall area (follow signs for Valley Loop Trail). Route-finding can be difficult in places, so it is best to bring a map with you (even a simple day hiking brochure from the visitor center) as it will orient you with the various landforms in the Valley, which are often listed on the trail/directional signs.
From the Lower Yosemite Fall area, head west along the base of the Three Brothers rock formation, past Camp 4, eventually working your way through Yosemite Valley to El Capitan. If you are planning to hike the half loop, cross the Merced River at El Capitan Bridge and continue by heading east back toward Yosemite Village. If you are planning to hike the full loop, continue west past El Capitan toward Bridalveil Fall. While most of the trail is flat, there are some hilly sections throughout the hike. Additionally, you will find mixed trail surfaces: dirt, rocks, sand, and old pavement.
Seasonality
The Valley Loop Trail is open year-round. During spring, you may find localized flooding on the trail near creeks. During winter, the trail is often snowy and icy in places, particularly along the south side of Yosemite Valley. In these areas, use extreme caution as it may be hard to get traction on ice and route-finding may be difficult in snowy areas (the trail may be completely obscured by just a few inches of snow).
Valley Floor Loop profile (counter-clockwise direction)
Stay Safe
Plan ahead; stay hydrated by carrying plenty of water as no drinking water is available along the trail.
Wear appropriate footwear for a long hike over varying terrain.
Water
Drinking water is not available along the trail. A drinking fountain is available at the start of the trail near the Lower Yosemite Fall Trailhead.
Restrooms
Restrooms are available at the trailhead near the start of the Lower Yosemite Fall Trail. Vault toilets are also available at the Bridalveil Fall parking area and Swinging Bridge Picnic Area.
Parking
Parking is not available at the trailhead; the trail begins at the Lower Yosemite Fall Trailhead (near shuttle stop #6). Primary parking is available at the Yosemite Village and Yosemite Falls parking areas. You can also access the trail from various roadside parking areas throughout Yosemite Valley.
Transportation
The Valley Visitor Shuttle (7 am to 10 pm year-round) serves this trailhead (stop #6). You can also walk from the Yosemite Village area along the bicycle path to get to the trailhead (this adds approximately 0.5 mile (0.8 km) to your hike). From May to October, the El Capitan Shuttle stops at the El Capitan Bridge (stop E4) and the Four Mile Trailhead (stop E5), should you need alternate transportation back.
Trail Etiquette
Pets, bicycles, and strollers are prohibited. Keep your food within arm's reach at all times and do not feed the wildlife. Carry out all trash and food waste (fruit peels, shells, etc.).
Vernal Fall Footbridge
Distance: 1.6 mi (2.6 km) round trip
Elevation gain: 400 ft (120 m)
Difficulty: Moderate
Time: 1-1.5 hours
Top of Vernal Fall
Distance: 2.4 mi (3.9 km) round trip (via Mist Trail)
Elevation gain: 1000 ft (300 m)
Difficulty: Strenuous
Time: 3 hours
Top of Nevada Fall
Distance: 5.4 mi (8.7 km) round trip (via Mist Trail)
Elevation gain: 2000 ft (610 m)
Difficulty: Strenuous
Time: 5-6 hours
You can also take the John Muir Trail to the top of Vernal Fall (via the Clark Point cutoff) and the top of Nevada Fall, or combine the Mist Trail and John Muir Trail into a loop. See the map, profile, and description below for more information.
All begin at: Happy Isles (shuttle stop #16)
This very popular hike originates near Happy Isles in eastern Yosemite Valley (shuttle stop #16). The John Muir and Mist Trails offer spectacular, up-close views of two large waterfalls, enjoyable scenery along the Merced River, and unique views across Yosemite Valley. This first paved mile of trail is busiest and accesses the Vernal Fall Footbridge. Almost entirely uphill, you can appreciate views along the way, and during spring, when the water levels are at their peak, you can also glimpse Illillouette Fall from this first section of trail.
You'll find an excellent view of Vernal Fall from the footbridge at 0.8 miles (1.3 km). About 0.2 miles (0.3 km) beyond the bridge, the Mist Trail and the John Muir Trail diverge. To proceed directly to the top of Vernal Fall, follow the Mist Trail 0.3 miles (0.5 km) up a steep granite stairway of over 600 steps. Prepare for slippery footing and a tremendous amount of waterfall spray in spring and early summer (hence the name for this trail!). You will delight in views of Vernal Fall all along this stretch of trail and may even be able to see a rainbow in the spray of the fall. At the top of Vernal Fall, you can experience jaw-dropping views straight down the length of the 317-foot waterfall (please don't cross the railings and use extreme caution while you're near any flowing water or wet rock in this area).
From this point, you can: choose to turn around and head back the way you came; continue up to the next junction (about 0.2 miles / 0.3 km) and take the longer route back via the John Muir Trail; or continue uphill on the Mist Trail to the top of Nevada Fall. If you choose to continue on the Mist Trail, shortly beyond Vernal Fall, you will pass by Emerald Pool and Silver Apron. Both of these look may look inviting on a hot summer’s day, but it is illegal and dangerous to swim here due to the extremely hazardous current.
Continuing along the Mist Trail, you’ll experience another 1.5 miles (2.4 km) of steep, rocky switchbacks in order to reach Nevada Fall. Crashing down 594 feet, this thunderous waterfall is fullest in spring and early summer, and you will find terrific photographic opportunities along this stretch of trail. At the top of the climb, head right to reach the footbridge that crosses the Merced River above the fall, allowing you a closer view of it. Use extreme caution while you're near any flowing water or wet rock in this area.
From here, you can either return down the Mist Trail, or continue over the bridge to the John Muir Trail for an alternate route back to Yosemite Valley. If you choose the John Muir Trail, you will enjoy different scenery, with great views of Liberty Cap and different views of Nevada Fall. The John Muir Trail is longer—approximately 4 miles one-way compared to the Mist Trail’s 2.5 miles (4 km)—so plan accordingly.
Some hikers may be continuing from the top of Nevada Fall to hike to Half Dome or elsewhere in Yosemite’s wilderness.
Seasonality
You can hike to both waterfalls all year. However, in winter, there is a specific route that remains open while some sections of trail are closed. The lower portion of the Mist Trail along Vernal Fall closes in winter due to risk of falling ice and rock. The upper portion of the John Muir Trail between Clark Point and the top of Nevada Fall is closed in winter due to treacherously icy conditions. Keep in mind that the sections of trail that remain open in the winter may be very icy and/or snowy. View current conditions for trail closures and view historical opening and closing dates for this trail.
View a trail profile and map of the winter route to the top of Vernal Fall and Nevada Fall.
The Mist Trail and John Muir Trail overlaid side by side
Stay Safe
Stay on the established trail: do not swim or wade in the river and do not walk along the edge of the river.
Observe warning signs and railings—these exist for your safety.
Carry a head lamp (with fresh or extra batteries) in case you end up hiking more slowly or farther then planned and find yourself hiking back in the dark.
Sprained ankles and knee injuries are common on this trail. There are many areas of loose rock/decomposed granite, mixed with steep steps, and water, which makes for slippery footing in places.
Avoid becoming dehydrated or experiencing heat exhaustion. Drink plenty and drink often; pace yourself; rest in the shade; and eat salty snacks.
The granite steps along the Mist Trail leading up to the brink of Vernal Fall can be slick and crowded. Consider making a loop by continuing on the trail, past the brink of Vernal Fall and Emerald Pool, taking the cutoff trail to Clark Point, and then hiking down the John Muir Trail.
Water
Drinking water is available at the shuttle stop near the trailhead (stop #16) and also at the Vernal Fall Footbridge (May to October). This is the only drinking water available along the trail, so carry plenty of water for your hike.
Destination Amount of water
to bring
Vernal Fall Footbridge 1 quart/liter
Top of Vernal Fall 2 quarter/liters
Top of Nevada Fall 3-4 quarts/liters
Restrooms
Unlike many other trails in the park, several restrooms are available along your hike. Restrooms are located at the shuttle stop near the trailhead (stop #16). Additionally, restrooms are located at the Vernal Fall footbridge, approximately 1 mile up the trail (May to October). Vault toilets are available beyond the top of Vernal Fall (along the Mist Trail) and at the top of Nevada Fall (along the Mist Trail).
Parking
Parking is not available at the trailhead itself, but you can park at Curry Village, less than one mile (1.6 km) from the trailhead. However, accessing the trailhead is easy by taking the Valley Visitor Shuttle (7 am to 10 pm year-round) to shuttle stop #16.
Transportation
Ride the Valley Visitor Shuttle (7 am to 10 pm year-round) to shuttle stop #16 and follow the signs across the bridge to where the trail begins.
Trail Etiquette
Pets, bicycles, and strollers are prohibited. Do not shortcut switchbacks, which causes rapid trail erosion and results in injuries. Keep your food within arm's reach at all times and do not feed the wildlife. Carry out all trash and food waste (fruit peels, shells, etc.).
15 polecane przez mieszkańców
Vernal Fall
Vernal Fall Footbridge
Distance: 1.6 mi (2.6 km) round trip
Elevation gain: 400 ft (120 m)
Difficulty: Moderate
Time: 1-1.5 hours
Top of Vernal Fall
Distance: 2.4 mi (3.9 km) round trip (via Mist Trail)
Elevation gain: 1000 ft (300 m)
Difficulty: Strenuous
Time: 3 hours
Top of Nevada Fall
Distance: 5.4 mi (8.7 km) round trip (via Mist Trail)
Elevation gain: 2000 ft (610 m)
Difficulty: Strenuous
Time: 5-6 hours
You can also take the John Muir Trail to the top of Vernal Fall (via the Clark Point cutoff) and the top of Nevada Fall, or combine the Mist Trail and John Muir Trail into a loop. See the map, profile, and description below for more information.
All begin at: Happy Isles (shuttle stop #16)
This very popular hike originates near Happy Isles in eastern Yosemite Valley (shuttle stop #16). The John Muir and Mist Trails offer spectacular, up-close views of two large waterfalls, enjoyable scenery along the Merced River, and unique views across Yosemite Valley. This first paved mile of trail is busiest and accesses the Vernal Fall Footbridge. Almost entirely uphill, you can appreciate views along the way, and during spring, when the water levels are at their peak, you can also glimpse Illillouette Fall from this first section of trail.
You'll find an excellent view of Vernal Fall from the footbridge at 0.8 miles (1.3 km). About 0.2 miles (0.3 km) beyond the bridge, the Mist Trail and the John Muir Trail diverge. To proceed directly to the top of Vernal Fall, follow the Mist Trail 0.3 miles (0.5 km) up a steep granite stairway of over 600 steps. Prepare for slippery footing and a tremendous amount of waterfall spray in spring and early summer (hence the name for this trail!). You will delight in views of Vernal Fall all along this stretch of trail and may even be able to see a rainbow in the spray of the fall. At the top of Vernal Fall, you can experience jaw-dropping views straight down the length of the 317-foot waterfall (please don't cross the railings and use extreme caution while you're near any flowing water or wet rock in this area).
From this point, you can: choose to turn around and head back the way you came; continue up to the next junction (about 0.2 miles / 0.3 km) and take the longer route back via the John Muir Trail; or continue uphill on the Mist Trail to the top of Nevada Fall. If you choose to continue on the Mist Trail, shortly beyond Vernal Fall, you will pass by Emerald Pool and Silver Apron. Both of these look may look inviting on a hot summer’s day, but it is illegal and dangerous to swim here due to the extremely hazardous current.
Continuing along the Mist Trail, you’ll experience another 1.5 miles (2.4 km) of steep, rocky switchbacks in order to reach Nevada Fall. Crashing down 594 feet, this thunderous waterfall is fullest in spring and early summer, and you will find terrific photographic opportunities along this stretch of trail. At the top of the climb, head right to reach the footbridge that crosses the Merced River above the fall, allowing you a closer view of it. Use extreme caution while you're near any flowing water or wet rock in this area.
From here, you can either return down the Mist Trail, or continue over the bridge to the John Muir Trail for an alternate route back to Yosemite Valley. If you choose the John Muir Trail, you will enjoy different scenery, with great views of Liberty Cap and different views of Nevada Fall. The John Muir Trail is longer—approximately 4 miles one-way compared to the Mist Trail’s 2.5 miles (4 km)—so plan accordingly.
Some hikers may be continuing from the top of Nevada Fall to hike to Half Dome or elsewhere in Yosemite’s wilderness.
Seasonality
You can hike to both waterfalls all year. However, in winter, there is a specific route that remains open while some sections of trail are closed. The lower portion of the Mist Trail along Vernal Fall closes in winter due to risk of falling ice and rock. The upper portion of the John Muir Trail between Clark Point and the top of Nevada Fall is closed in winter due to treacherously icy conditions. Keep in mind that the sections of trail that remain open in the winter may be very icy and/or snowy. View current conditions for trail closures and view historical opening and closing dates for this trail.
View a trail profile and map of the winter route to the top of Vernal Fall and Nevada Fall.
The Mist Trail and John Muir Trail overlaid side by side
Stay Safe
Stay on the established trail: do not swim or wade in the river and do not walk along the edge of the river.
Observe warning signs and railings—these exist for your safety.
Carry a head lamp (with fresh or extra batteries) in case you end up hiking more slowly or farther then planned and find yourself hiking back in the dark.
Sprained ankles and knee injuries are common on this trail. There are many areas of loose rock/decomposed granite, mixed with steep steps, and water, which makes for slippery footing in places.
Avoid becoming dehydrated or experiencing heat exhaustion. Drink plenty and drink often; pace yourself; rest in the shade; and eat salty snacks.
The granite steps along the Mist Trail leading up to the brink of Vernal Fall can be slick and crowded. Consider making a loop by continuing on the trail, past the brink of Vernal Fall and Emerald Pool, taking the cutoff trail to Clark Point, and then hiking down the John Muir Trail.
Water
Drinking water is available at the shuttle stop near the trailhead (stop #16) and also at the Vernal Fall Footbridge (May to October). This is the only drinking water available along the trail, so carry plenty of water for your hike.
Destination Amount of water
to bring
Vernal Fall Footbridge 1 quart/liter
Top of Vernal Fall 2 quarter/liters
Top of Nevada Fall 3-4 quarts/liters
Restrooms
Unlike many other trails in the park, several restrooms are available along your hike. Restrooms are located at the shuttle stop near the trailhead (stop #16). Additionally, restrooms are located at the Vernal Fall footbridge, approximately 1 mile up the trail (May to October). Vault toilets are available beyond the top of Vernal Fall (along the Mist Trail) and at the top of Nevada Fall (along the Mist Trail).
Parking
Parking is not available at the trailhead itself, but you can park at Curry Village, less than one mile (1.6 km) from the trailhead. However, accessing the trailhead is easy by taking the Valley Visitor Shuttle (7 am to 10 pm year-round) to shuttle stop #16.
Transportation
Ride the Valley Visitor Shuttle (7 am to 10 pm year-round) to shuttle stop #16 and follow the signs across the bridge to where the trail begins.
Trail Etiquette
Pets, bicycles, and strollers are prohibited. Do not shortcut switchbacks, which causes rapid trail erosion and results in injuries. Keep your food within arm's reach at all times and do not feed the wildlife. Carry out all trash and food waste (fruit peels, shells, etc.).
A steep climb is well rewarded with close-up views of Upper Yosemite Fall and distant views of Half Dome and other Sierra mountain peaks. Along the hike, enjoy a bird's eye view of Yosemite Valley's meadows and the meandering Merced River.
Trail Overview
Columbia Rock
Distance: 2 miles (3.2 km) round trip
Elevation: 1,000 ft (328 m) elevation gain
Difficulty: Moderate
Time: 2-3 hours round trip
Begin at: Camp 4 area (near shuttle stop #7 and El Capitan Shuttle stop #E2)
Top of Yosemite Falls
Distance: 7.2 miles (11.6 km) round trip
Elevation: 2,700 ft (823 m) elevation gain
Difficulty: Strenuous
Time: 6-8 hours round trip
Begin at: Camp 4 area (near shuttle stop #7 and El Capitan Shuttle stop #E2)
One of Yosemite's oldest historic trails (built 1873 to 1877), the Yosemite Falls Trail leads to the top of North America’s tallest waterfall, which rises 2,425 feet (739 m) above the Valley floor. This trail starts near Camp 4, along the Valley Loop Trail, and immediately begins its climb, switchback after switchback, through oak woodland. You will begin to climb above some trees and into exposed plateaus that offer you a glimpse of what's to come: great views of Yosemite Valley and its many iconic landforms. Do not stray off of the maintained path, as you will find steep drops adjacent to the trail.
If you make the one-mile, 1,000 foot climb (via dozens of switchbacks) to Columbia Rock, you will be rewarded with spectacular views of Yosemite Valley, Half Dome, and Sentinel Rock. From there, it is worth the time and energy to hike another 0.5 miles (0.8 km) (some of which is actually downhill!) to get a stunning view of Upper Yosemite Fall. Depending on the season, you may even feel the mist from the fall, which may be welcome respite after the tough climb.
The upper half of the trail is steep and rocky, but the arduous climb is well worth the amazing views you will be rewarded with at the top. Here you may be surprised by the small size of Yosemite Creek, which feeds this massive waterfall. Use extreme caution when near the creek and remember you are directly above a waterfall.
At the top of the Yosemite Falls Trail, you can extend your hike east to Yosemite Point (follow signs for North Dome; adds 1.6 miles roundtrip (2.6 km) to this hike) or west to Eagle Peak (follow signs to El Capitan, adds 5.8 miles roundtrip (9.3 km) to this hike). Yosemite Point offers direct views of Half Dome that rival those found on the North Dome trail, gives you an opportunity to see Lost Arrow Spire up close, and provides panoramic views of many other peaks. Eagle Peak, part of the Three Brothers rock formation, is the highest point on the north rim of Yosemite Valley, which gives you a different perspective of the surrounding granite landscape.
To learn more about this Yosemite icon, view a 10-minute podcast episode about Yosemite Falls.
Seasonality
The Yosemite Falls Trail is open year-round; conditions vary depending on the season. In spring, when the waterfall is at its peak, this hike is stunning, and you may even get wet from the spray of the waterfall during a section of the hike. In summer, conditions are hot and dry, and the loose decomposed granite along the trail can be slippery. Keep in mind that by August, the water levels are low and you may only see a trickle here. (Check out our Yosemite Falls webcam to see a current view.) During winter, the lower portion of this trail gets direct sunlight, so hiking can be snow-free while other trails are icy. Visiting Columbia Rock, located one mile up the trail, is a worthwhile trip at any time of year. The upper portion of this trail, which receives little to no sunlight in winter, can be very icy and slippery, or buried beneath feet of snow, making traction difficult. In winter, hiking in the colder early morning or late afternoon hours can be even more dangerous if the trail is icy.
The Upper Yosemite Fall Trail profile
Stay Safe
Start your hike early; this trail can become very hot mid-day in the summer. By starting as early as possible, you will be able to hike during the cooler part of the day. The upper portion of the trail is exposed, receiving no shade until late afternoon or early evening.
Avoid becoming dehydrated or experiencing heat exhaustion. Drink plenty and drink often; pace yourself; rest in the shade; eat salty snacks.
Sprained ankles and knee injuries are common on this trail. There are many areas of loose sand mixed with rocky terrain, which makes for slippery footing.
Stay on the trail; there are numerous steep drop-offs and ledges off-trail.
Know your limits. Pre-existing medical conditions can be easily exacerbated on the steep ascent.
Do not swim or wade in the creek above the waterfall.
Water
Drinking water is not available along the trail. A drinking fountain is available near the trailhead in Camp 4. Bring 4 quarts/liters of water if hiking to the top of Yosemite Falls.
Restrooms
Restrooms are not available along the trail; the nearest ones are in Camp 4 near the trailhead.
Parking
The Yosemite Falls trailhead is located along the Valley Loop Trail near Camp 4. The Camp 4 parking area is for campers only, but there is parking at the Yosemite Falls parking area across the street from, and just beyond the entrance to Camp 4.
Transportation
The Valley Visitor Shuttle (7 am to 10 pm year-round) serves the trailhead area. Ride the shuttle to stop #7 and walk directly across the street to Camp 4 and follow trailhead signs. You can also ride the El Capitan Shuttle (9 am to 6 pm) to Camp 4 (stop E2) from late May through early October.
Trail Etiquette
Pets, bicycles, and strollers are prohibited. Do not shortcut switchbacks, which causes rapid trail erosion and results in injuries. Keep your food within arm's reach at all times and do not feed the wildlife. Carry out all trash and food waste (fruit peels, shells, etc.).
6 polecane przez mieszkańców
Yosemite Falls Trailhead
Yosemite Falls TrailA steep climb is well rewarded with close-up views of Upper Yosemite Fall and distant views of Half Dome and other Sierra mountain peaks. Along the hike, enjoy a bird's eye view of Yosemite Valley's meadows and the meandering Merced River.
Trail Overview
Columbia Rock
Distance: 2 miles (3.2 km) round trip
Elevation: 1,000 ft (328 m) elevation gain
Difficulty: Moderate
Time: 2-3 hours round trip
Begin at: Camp 4 area (near shuttle stop #7 and El Capitan Shuttle stop #E2)
Top of Yosemite Falls
Distance: 7.2 miles (11.6 km) round trip
Elevation: 2,700 ft (823 m) elevation gain
Difficulty: Strenuous
Time: 6-8 hours round trip
Begin at: Camp 4 area (near shuttle stop #7 and El Capitan Shuttle stop #E2)
One of Yosemite's oldest historic trails (built 1873 to 1877), the Yosemite Falls Trail leads to the top of North America’s tallest waterfall, which rises 2,425 feet (739 m) above the Valley floor. This trail starts near Camp 4, along the Valley Loop Trail, and immediately begins its climb, switchback after switchback, through oak woodland. You will begin to climb above some trees and into exposed plateaus that offer you a glimpse of what's to come: great views of Yosemite Valley and its many iconic landforms. Do not stray off of the maintained path, as you will find steep drops adjacent to the trail.
If you make the one-mile, 1,000 foot climb (via dozens of switchbacks) to Columbia Rock, you will be rewarded with spectacular views of Yosemite Valley, Half Dome, and Sentinel Rock. From there, it is worth the time and energy to hike another 0.5 miles (0.8 km) (some of which is actually downhill!) to get a stunning view of Upper Yosemite Fall. Depending on the season, you may even feel the mist from the fall, which may be welcome respite after the tough climb.
The upper half of the trail is steep and rocky, but the arduous climb is well worth the amazing views you will be rewarded with at the top. Here you may be surprised by the small size of Yosemite Creek, which feeds this massive waterfall. Use extreme caution when near the creek and remember you are directly above a waterfall.
At the top of the Yosemite Falls Trail, you can extend your hike east to Yosemite Point (follow signs for North Dome; adds 1.6 miles roundtrip (2.6 km) to this hike) or west to Eagle Peak (follow signs to El Capitan, adds 5.8 miles roundtrip (9.3 km) to this hike). Yosemite Point offers direct views of Half Dome that rival those found on the North Dome trail, gives you an opportunity to see Lost Arrow Spire up close, and provides panoramic views of many other peaks. Eagle Peak, part of the Three Brothers rock formation, is the highest point on the north rim of Yosemite Valley, which gives you a different perspective of the surrounding granite landscape.
To learn more about this Yosemite icon, view a 10-minute podcast episode about Yosemite Falls.
Seasonality
The Yosemite Falls Trail is open year-round; conditions vary depending on the season. In spring, when the waterfall is at its peak, this hike is stunning, and you may even get wet from the spray of the waterfall during a section of the hike. In summer, conditions are hot and dry, and the loose decomposed granite along the trail can be slippery. Keep in mind that by August, the water levels are low and you may only see a trickle here. (Check out our Yosemite Falls webcam to see a current view.) During winter, the lower portion of this trail gets direct sunlight, so hiking can be snow-free while other trails are icy. Visiting Columbia Rock, located one mile up the trail, is a worthwhile trip at any time of year. The upper portion of this trail, which receives little to no sunlight in winter, can be very icy and slippery, or buried beneath feet of snow, making traction difficult. In winter, hiking in the colder early morning or late afternoon hours can be even more dangerous if the trail is icy.
The Upper Yosemite Fall Trail profile
Stay Safe
Start your hike early; this trail can become very hot mid-day in the summer. By starting as early as possible, you will be able to hike during the cooler part of the day. The upper portion of the trail is exposed, receiving no shade until late afternoon or early evening.
Avoid becoming dehydrated or experiencing heat exhaustion. Drink plenty and drink often; pace yourself; rest in the shade; eat salty snacks.
Sprained ankles and knee injuries are common on this trail. There are many areas of loose sand mixed with rocky terrain, which makes for slippery footing.
Stay on the trail; there are numerous steep drop-offs and ledges off-trail.
Know your limits. Pre-existing medical conditions can be easily exacerbated on the steep ascent.
Do not swim or wade in the creek above the waterfall.
Water
Drinking water is not available along the trail. A drinking fountain is available near the trailhead in Camp 4. Bring 4 quarts/liters of water if hiking to the top of Yosemite Falls.
Restrooms
Restrooms are not available along the trail; the nearest ones are in Camp 4 near the trailhead.
Parking
The Yosemite Falls trailhead is located along the Valley Loop Trail near Camp 4. The Camp 4 parking area is for campers only, but there is parking at the Yosemite Falls parking area across the street from, and just beyond the entrance to Camp 4.
Transportation
The Valley Visitor Shuttle (7 am to 10 pm year-round) serves the trailhead area. Ride the shuttle to stop #7 and walk directly across the street to Camp 4 and follow trailhead signs. You can also ride the El Capitan Shuttle (9 am to 6 pm) to Camp 4 (stop E2) from late May through early October.
Trail Etiquette
Pets, bicycles, and strollers are prohibited. Do not shortcut switchbacks, which causes rapid trail erosion and results in injuries. Keep your food within arm's reach at all times and do not feed the wildlife. Carry out all trash and food waste (fruit peels, shells, etc.).
Hiking - Strenuous
After you venture beyond Mirror Lake, you'll be rewarded with views across Tenaya Canyon and be dwarfed by Half Dome as you climb out of Yosemite Valley, one switchback at a time.
Distance: 9.4 mi (15.1 km) round trip
Elevation gain: 2,700 ft (820 m)
Difficulty: Strenuous
Time: 6-7 hours
Begin at: Mirror Lake Trailhead (shuttle stop #17)
This trail is tucked back in Tenaya Canyon, accessed from the eastern Yosemite Valley. It is a grueling hike that begins on the Valley floor and climbs to its rim, but which offers great views along the way. Comparable to the Yosemite Falls Trail, this trail climbs steeply along several dozen switchbacks but is narrower in comparison. Snow Creek Falls is the nearby cascade, but is not visible from this trail. You will often find fewer people on this trail compared to other Yosemite Valley trails.
The first part of the trail consists of the Mirror Lake Trail. About a mile beyond Mirror Lake, you'll come to the junction of the Snow Creek Trail. From here, you will begin climbing steeply out of Tenaya Canyon, one switchback after another. You are rewarded with good views of various granite landforms (e.g., Half Dome, Quarter Domes, Clouds Rest) after only a dozen or so switchbacks. The views get better as you climb higher until the trail leaves the open canyon walls and enters the forest. Approximately 2.6 miles (4.2 km) after beginning the uphill climb, you'll reach a trail junction near Snow Creek. A right at the fork brings you to the footbridge and makes a logical turnaround point. If you aren't up for the strenuous, 2,700-foot climb to the footbridge, then take pleasure in knowing that you can enjoy fantastic views from partway up and choose your turnaround point at your own leisure.
Seasonality
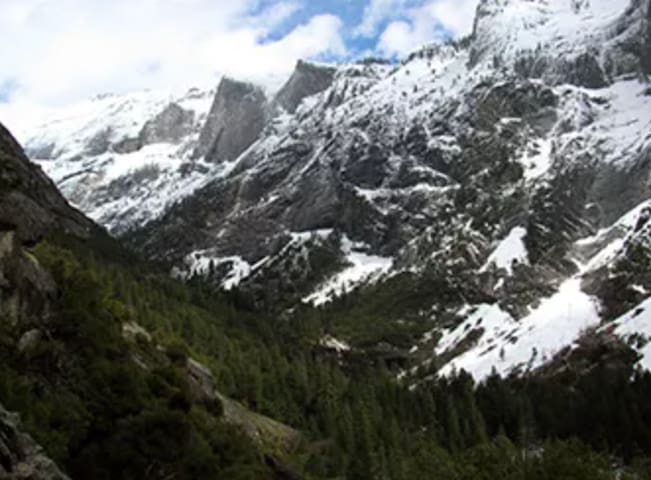
The Snow Creek Trail is open year-round and in winter becomes a popular trail for backpackers (equipped with snow shoes and/or cross-country skis) to access the wilderness. The lower portion of the trail can be snow covered and very icy in winter (the upper portion receives abundant sun and usually melts out with good weather).
Snow Creek Trail profile
Stay Safe
Start your hike early; this trail can become very hot mid-day in the summer. By starting as early as possible, you will be able to hike during the cooler part of the day. Much of the trail is exposed, receiving little to no shade until late afternoon or early evening.
Avoid becoming dehydrated or experiencing heat exhaustion. Drink plenty and drink often; pace yourself; rest in the shade; eat salty snacks.
Sprained ankles and knee injuries are common on this trail. There are many areas of loose sand mixed with rocky terrain, which can make for slippery footing in places.
Stay on the trail; there are numerous steep drop-offs and ledges off-trail.
Know your limits. Pre-existing medical conditions can be easily exacerbated on the steep ascent.
Be aware of rattlesnakes! Watch where you step, and if you want to take a break, look first before sitting and watch where you place your hands.
Water
Drinking water is not available along the trail or at the trailhead. Plan ahead and bring plenty of water for your hike.
Restrooms
Vault toilets are available 0.5 miles (0.8 km) from the trailhead and again 1 mile (1.6 km) from the trailhead at the end of the paved service road at Mirror Lake. There are no additional restrooms along the trail.
Parking
Parking is not available at the trailhead. The nearest parking area is at Curry Village, though you can easily access the trail by parking anywhere in eastern Yosemite Valley and taking the free shuttle.
Transportation
The Valley Visitor Shuttle (7 am to 10 pm year-round) serves the trailhead at shuttle stop #17. You can also bicycle the first mile of the trail to the end of the paved service road. From there, you can either turn around or park your bike and begin your hike.
Trail Etiquette
Leashed pets, bicycles, and strollers are allowed on the first paved mile of the trail. Beyond that, they are prohibited. Do not shortcut switchbacks, which causes rapid trail erosion and results in injuries. Keep your food within arm's reach at all times and do not feed the wildlife. Carry out all trash and food waste (fruit peels, shells, etc.).
Snow Creek Trail
Snow Creek TrailAfter you venture beyond Mirror Lake, you'll be rewarded with views across Tenaya Canyon and be dwarfed by Half Dome as you climb out of Yosemite Valley, one switchback at a time.
Distance: 9.4 mi (15.1 km) round trip
Elevation gain: 2,700 ft (820 m)
Difficulty: Strenuous
Time: 6-7 hours
Begin at: Mirror Lake Trailhead (shuttle stop #17)
This trail is tucked back in Tenaya Canyon, accessed from the eastern Yosemite Valley. It is a grueling hike that begins on the Valley floor and climbs to its rim, but which offers great views along the way. Comparable to the Yosemite Falls Trail, this trail climbs steeply along several dozen switchbacks but is narrower in comparison. Snow Creek Falls is the nearby cascade, but is not visible from this trail. You will often find fewer people on this trail compared to other Yosemite Valley trails.
The first part of the trail consists of the Mirror Lake Trail. About a mile beyond Mirror Lake, you'll come to the junction of the Snow Creek Trail. From here, you will begin climbing steeply out of Tenaya Canyon, one switchback after another. You are rewarded with good views of various granite landforms (e.g., Half Dome, Quarter Domes, Clouds Rest) after only a dozen or so switchbacks. The views get better as you climb higher until the trail leaves the open canyon walls and enters the forest. Approximately 2.6 miles (4.2 km) after beginning the uphill climb, you'll reach a trail junction near Snow Creek. A right at the fork brings you to the footbridge and makes a logical turnaround point. If you aren't up for the strenuous, 2,700-foot climb to the footbridge, then take pleasure in knowing that you can enjoy fantastic views from partway up and choose your turnaround point at your own leisure.
Seasonality
The Snow Creek Trail is open year-round and in winter becomes a popular trail for backpackers (equipped with snow shoes and/or cross-country skis) to access the wilderness. The lower portion of the trail can be snow covered and very icy in winter (the upper portion receives abundant sun and usually melts out with good weather).
Snow Creek Trail profile
Stay Safe
Start your hike early; this trail can become very hot mid-day in the summer. By starting as early as possible, you will be able to hike during the cooler part of the day. Much of the trail is exposed, receiving little to no shade until late afternoon or early evening.
Avoid becoming dehydrated or experiencing heat exhaustion. Drink plenty and drink often; pace yourself; rest in the shade; eat salty snacks.
Sprained ankles and knee injuries are common on this trail. There are many areas of loose sand mixed with rocky terrain, which can make for slippery footing in places.
Stay on the trail; there are numerous steep drop-offs and ledges off-trail.
Know your limits. Pre-existing medical conditions can be easily exacerbated on the steep ascent.
Be aware of rattlesnakes! Watch where you step, and if you want to take a break, look first before sitting and watch where you place your hands.
Water
Drinking water is not available along the trail or at the trailhead. Plan ahead and bring plenty of water for your hike.
Restrooms
Vault toilets are available 0.5 miles (0.8 km) from the trailhead and again 1 mile (1.6 km) from the trailhead at the end of the paved service road at Mirror Lake. There are no additional restrooms along the trail.
Parking
Parking is not available at the trailhead. The nearest parking area is at Curry Village, though you can easily access the trail by parking anywhere in eastern Yosemite Valley and taking the free shuttle.
Transportation
The Valley Visitor Shuttle (7 am to 10 pm year-round) serves the trailhead at shuttle stop #17. You can also bicycle the first mile of the trail to the end of the paved service road. From there, you can either turn around or park your bike and begin your hike.
Trail Etiquette
Leashed pets, bicycles, and strollers are allowed on the first paved mile of the trail. Beyond that, they are prohibited. Do not shortcut switchbacks, which causes rapid trail erosion and results in injuries. Keep your food within arm's reach at all times and do not feed the wildlife. Carry out all trash and food waste (fruit peels, shells, etc.).
Views of Yosemite Falls and Yosemite Valley await hikers, topped off with a panorama of Half Dome and Sierra mountain peaks from Glacier Point.
Distance: 4.8 mi (7.7 km) one way to Glacier Point. 9.6 mi (15.5 km) round trip.
Elevation: 3,200 ft (975 m) elevation gain
Difficulty: Strenuous
Time: 3-4 hours one-way, 6-8 hours round trip
Begin at: Four Mile Trailhead along Southside Drive in Yosemite Valley
This trail begins near the base of Sentinel Rock and climbs to the top of Yosemite Valley at Glacier Point. The trail maintains a continuous steep grade, following the path of an old toll trail that was completed in 1872. The trail has changed a bit over the years; it is now closer to five miles than four (and of course there is no more toll). Spectacular views of Yosemite Valley, El Capitan, Yosemite Falls, and, eventually, Half Dome await those willing to tackle this strenuous trail. Don't skip the side trip to enjoy the view of Yosemite Valley from Union Point, located a bit over two-thirds of the way up.
The Four Mile Trail ends at Glacier Point, where restrooms, parking, and a snack stand (summer only) are available. You can choose to hike back to Yosemite Valley by reversing your route or by continuing on the Panorama Trail, which brings you to the Happy Isles Trailhead in another 8.5 miles (13.7 km).
If you want to hike one way, make sure you have another member of your party available to drop you off or pick you up at the other end. There is no free shuttle system between Glacier Point and Yosemite Valley. The park concessioner runs three daily guided bus tours that include a stop at Glacier Point—you can purchase a tour bus ticket from any tour desk to ride the bus to Glacier Point (hiking back to the Valley). You should purchase this ticket in advance to guarantee your space, but advance tickets are only available if riding the bus from Yosemite Valley to Glacier Point. There is no way to guarantee space riding from Glacier Point to Yosemite Valley; tickets in this direction can only be purchased in cash from the bus driver if space is available.
Seasonality
The Four Mile Trail typically opens for the season sometime in May and closes below Union Point due to treacherous conditions after significant snow accumulation (usually by November or December). After major snowfalls, the entire trail may close. When partially closed, only the lower three miles (5 km) are open to the gate below Union Point; good views of Yosemite Valley are still possible, although Glacier Point and Union Point would not be accessible. This lower section is also very icy and slippery during winter and early spring. View current conditions for trail closures and view historical opening and closing dates for this trail.
Four Mile Trail profile
Stay Safe
Start your hike early; this trail can become very hot mid-day. By starting as early as possible, you will be able to spend more of the hike in shade and less in the sun.
Stay on the trail and resist the temptation to cut switchbacks. Cutting switchbacks is illegal, and there are many drop-offs and ledges hidden by brush.
Sprained ankles are common on this trail. It is partially paved and has loose sand on top, which makes for slippery footing in places.
Water
Drinking water is not available along the trail. When the Glacier Point Snack Stand is open (late May through mid-October), food and beverages are available for purchase at Glacier Point. A drinking fountain is also available at Glacier Point (late May through mid-October). Bring 2 quarts/liters of water if hiking this trail one way (or 4 quarts/liters if hiking round trip).
Restrooms
Restrooms are not available at the trailhead in Yosemite Valley; vault toilets are available just to the east at the Swinging Bridge Picnic Area. Restrooms are also located at Glacier Point near the parking lot. (Flush toilets may be open from late May through mid-October, otherwise vault toilets are available.)
Parking
Parking is available along Southside Drive in Yosemite Valley (signed as "Four Mile Trail"). Parking is also available at Glacier Point, near the trail's end.
Transportation
The El Capitan Shuttle (9 am to 6 pm) serves this trailhead (stop E5) from late May through early October. You can also ride the Valley Visitor Shuttle (7 am to 10 pm year-round) to shuttle stop #7 and follow the bicycle path to Swinging Bridge, then walk west a few minutes to the trailhead. (This adds about 0.5 mile (0.8 km) to the total distance.)
If you want to hike one way, make sure you have another member of your party available to drop you off or pick you up at the other end. There is no free shuttle system between Glacier Point and Yosemite Valley. The park concessioner runs three daily guided bus tours that include a stop at Glacier Point—you can purchase a tour bus ticket from any tour desk to ride the bus to Glacier Point (hiking back to the Valley). You should purchase this ticket in advance to guarantee your space, but advance tickets are only available if riding the bus from Yosemite Valley to Glacier Point. There is no way to guarantee space riding from Glacier Point to Yosemite Valley; tickets in this direction can only be purchased in cash from the bus driver if space is available. Do not miss the bus; you will have no choice but to hike back yourself if you do so. Do not start hiking with the expectation of taking a bus back to the trailhead.
Trail Etiquette
Pets, bicycles, and strollers are prohibited. Do not shortcut switchbacks, which causes rapid trail erosion and results in injuries. Keep your food within arm's reach at all times and do not feed the wildlife. Carry out all trash and food waste (fruit peels, shells, etc.).
Four Mile Trail
Four Mile TrailViews of Yosemite Falls and Yosemite Valley await hikers, topped off with a panorama of Half Dome and Sierra mountain peaks from Glacier Point.
Distance: 4.8 mi (7.7 km) one way to Glacier Point. 9.6 mi (15.5 km) round trip.
Elevation: 3,200 ft (975 m) elevation gain
Difficulty: Strenuous
Time: 3-4 hours one-way, 6-8 hours round trip
Begin at: Four Mile Trailhead along Southside Drive in Yosemite Valley
This trail begins near the base of Sentinel Rock and climbs to the top of Yosemite Valley at Glacier Point. The trail maintains a continuous steep grade, following the path of an old toll trail that was completed in 1872. The trail has changed a bit over the years; it is now closer to five miles than four (and of course there is no more toll). Spectacular views of Yosemite Valley, El Capitan, Yosemite Falls, and, eventually, Half Dome await those willing to tackle this strenuous trail. Don't skip the side trip to enjoy the view of Yosemite Valley from Union Point, located a bit over two-thirds of the way up.
The Four Mile Trail ends at Glacier Point, where restrooms, parking, and a snack stand (summer only) are available. You can choose to hike back to Yosemite Valley by reversing your route or by continuing on the Panorama Trail, which brings you to the Happy Isles Trailhead in another 8.5 miles (13.7 km).
If you want to hike one way, make sure you have another member of your party available to drop you off or pick you up at the other end. There is no free shuttle system between Glacier Point and Yosemite Valley. The park concessioner runs three daily guided bus tours that include a stop at Glacier Point—you can purchase a tour bus ticket from any tour desk to ride the bus to Glacier Point (hiking back to the Valley). You should purchase this ticket in advance to guarantee your space, but advance tickets are only available if riding the bus from Yosemite Valley to Glacier Point. There is no way to guarantee space riding from Glacier Point to Yosemite Valley; tickets in this direction can only be purchased in cash from the bus driver if space is available.
Seasonality
The Four Mile Trail typically opens for the season sometime in May and closes below Union Point due to treacherous conditions after significant snow accumulation (usually by November or December). After major snowfalls, the entire trail may close. When partially closed, only the lower three miles (5 km) are open to the gate below Union Point; good views of Yosemite Valley are still possible, although Glacier Point and Union Point would not be accessible. This lower section is also very icy and slippery during winter and early spring. View current conditions for trail closures and view historical opening and closing dates for this trail.
Four Mile Trail profile
Stay Safe
Start your hike early; this trail can become very hot mid-day. By starting as early as possible, you will be able to spend more of the hike in shade and less in the sun.
Stay on the trail and resist the temptation to cut switchbacks. Cutting switchbacks is illegal, and there are many drop-offs and ledges hidden by brush.
Sprained ankles are common on this trail. It is partially paved and has loose sand on top, which makes for slippery footing in places.
Water
Drinking water is not available along the trail. When the Glacier Point Snack Stand is open (late May through mid-October), food and beverages are available for purchase at Glacier Point. A drinking fountain is also available at Glacier Point (late May through mid-October). Bring 2 quarts/liters of water if hiking this trail one way (or 4 quarts/liters if hiking round trip).
Restrooms
Restrooms are not available at the trailhead in Yosemite Valley; vault toilets are available just to the east at the Swinging Bridge Picnic Area. Restrooms are also located at Glacier Point near the parking lot. (Flush toilets may be open from late May through mid-October, otherwise vault toilets are available.)
Parking
Parking is available along Southside Drive in Yosemite Valley (signed as "Four Mile Trail"). Parking is also available at Glacier Point, near the trail's end.
Transportation
The El Capitan Shuttle (9 am to 6 pm) serves this trailhead (stop E5) from late May through early October. You can also ride the Valley Visitor Shuttle (7 am to 10 pm year-round) to shuttle stop #7 and follow the bicycle path to Swinging Bridge, then walk west a few minutes to the trailhead. (This adds about 0.5 mile (0.8 km) to the total distance.)
If you want to hike one way, make sure you have another member of your party available to drop you off or pick you up at the other end. There is no free shuttle system between Glacier Point and Yosemite Valley. The park concessioner runs three daily guided bus tours that include a stop at Glacier Point—you can purchase a tour bus ticket from any tour desk to ride the bus to Glacier Point (hiking back to the Valley). You should purchase this ticket in advance to guarantee your space, but advance tickets are only available if riding the bus from Yosemite Valley to Glacier Point. There is no way to guarantee space riding from Glacier Point to Yosemite Valley; tickets in this direction can only be purchased in cash from the bus driver if space is available. Do not miss the bus; you will have no choice but to hike back yourself if you do so. Do not start hiking with the expectation of taking a bus back to the trailhead.
Trail Etiquette
Pets, bicycles, and strollers are prohibited. Do not shortcut switchbacks, which causes rapid trail erosion and results in injuries. Keep your food within arm's reach at all times and do not feed the wildlife. Carry out all trash and food waste (fruit peels, shells, etc.).
Half Dome Cables
The most famous--or infamous--part of the hike is the ascent up the cables. The two metal cables allow hikers to climb the last 400 feet to the summit without rock climbing equipment. Since 1919, relatively few people have fallen and died on the cables. However, injuries are not uncommon for those acting irresponsibly.
The Half Dome cables usually go back up the Friday before the last Monday in May (Memorial Day) and come down the day after the second Monday in October (Columbus Day). These dates are subject to change based on conditions.
Tips while using the cables:
Take your time and be patient with slower hikers
Allow faster hikers to pass you (when possible)
Remain on the inside of the cables
Do not attempt the ascent if:
Storm clouds are in the area
The ground is wet (the cables and rock become very slick when wet; most accidents on the cables occur during wet conditions)
The cables are down for the winter (typically, from the day after Columbus Day until Memorial Day weekend) (check conditions update for status and any available updates)
Preparation
Footwear
Bring well broken-in boots with good ankle support and good traction. Some of the most common injuries Half Dome hikers suffer are blisters and ankle injuries; good footwear is the best way to prevent these problems.
Gloves
Many people find gloves helpful on the cables. However, if you bring your gloves up, pack them out. Hundreds of pounds of rotting gloves otherwise accumulate.
Trash
There is no trash service on trails. While hiking in Yosemite, be sure to pack out all trash. When possible, you can help park rangers by picking up trash that you encounter on the trail. Bearproof trash cans are available at trailheads.
Water
One of the easiest ways to ensure a safe, enjoyable hike is to be sure to have plenty of water. Weather conditions and personal preference affect the amount of water you need, but suggested minimum amounts per person are:
1 gallon (4 liters) if hiking to the top of Half Dome
2 quarts (2 liters) if hiking only to the top of Nevada Fall
1 quart (1 liter) if hiking only to the top of Vernal Fall
The only treated water on the trail is available (summer only) at a drinking fountain at the Vernal Fall Footbridge (less than a mile from the trailhead). Merced River water is available up to Little Yosemite Valley, however you should treat this water by boiling, using iodine, or using a giardia-rated water filter. Drinking untreated river water may cause significant illness.
Restrooms
Flush toilets are available at the Vernal Fall Footbridge (below Vernal Fall). Composting toilets are available near Emerald Pool (above Vernal Fall), near the top of Nevada Fall, and in Little Yosemite Valley.
At any other location, you are required to bury any solid human waste at least six inches (15 cm) deep and at least 100 feet (30 m) from water or trails. Pack out toilet paper.
Safety
Weather
The summit of Half Dome is a dangerous place during a lightning storm. Check the weather forecast before your hike and try to reach the summit early in the day to avoid thunderstorms, which are more common in the afternoon (but can occur at any time). If a storm appears nearby, do not continue to the summit and, if in the summit area, leave the area (while still using caution when descending the cables and steps).
The summit is typically 15°F (8°C) to 20°F (11°C) cooler than Yosemite Valley and windy conditions are common. Be prepared for cool temperatures and rain showers.
Altitude Sickness
A few visitors each summer have problems with altitude sickness. Symptoms may include severe headache and/or nausea. The only way to relieve altitude sickness is to descend immediately. Other environmental illnesses include heat exhaustion, dehydration, and hyponatremia (low electrolyte levels). In addition to drinking plenty of water, be sure to eat, and to take regular rest breaks in the shade.
Emerald Pool
Entering Emerald Pool and the Silver Apron is prohibited, and entering pools above waterfalls is strongly discouraged, because of frequent injuries and fatalities. Use extreme caution near flowing water; rocks adjacent to streams can be surprisingly slick.
Emergencies
Even if you plan properly and bring the correct equipment, you might still encounter problems. Some cell phones have coverage from Half Dome and from some locations on the trail. Little Yosemite Valley Ranger Station is staffed during summer. You can find the ranger station on the north side of the valley, near where the Half Dome Trail begins to climb out of the valley. Park rangers frequently patrol the trail, so the ranger station is not always staffed. You may need to send some members of your group to Yosemite Valley to get assistance.
Wildlife
Black bears frequent Yosemite's Wilderness and are adept at grabbing backpacks from hikers and campers--during both day and night. Always keep your food within arm's reach (or on your back); never leave it unattended. If you see a bear, act immediately to scare it away: make as much noise as possible by yelling. If there is more than one person, stand together to present a more intimidating figure, but do not surround the bear.
Squirrels, Steller's jays, chipmunks, and other animals also live along the trail; never feed them or allow them to get your food. Do not leave your pack unattended (e.g., at the base of the cables or while you take a swim or nap). Keep wildlife wild: respect them from a distance.
Improper food storage and feeding of wildlife may result in a fine (up to $5,000).
Trailhead and Parking Information
Most people begin the hike from Happy Isles (shuttle stop #16), which is about a half-mile from the trailhead parking lot or about 3/4 of a mile from Curry Village (parking available). Trailhead parking is just beyond Curry Village.
Shuttle service doesn't begin until 7 am, so if you're arriving prior to then, you can walk on the road (closed to all but authorized vehicles) from either parking area to the trailhead.
The nearest campgrounds are Upper, Lower, and North Pines Campgrounds, but reservations are very difficult to get in summer. Camp 4 walk-in campground is also busy. The nearest campgrounds outside Yosemite Valley that may have some first-come, first-served space are Bridalveil Creek and Tamarack Flat Campgrounds.
13 polecane przez mieszkańców
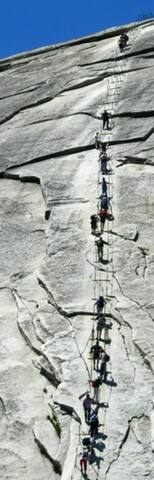
Half Dome
Half Dome Cables
The most famous--or infamous--part of the hike is the ascent up the cables. The two metal cables allow hikers to climb the last 400 feet to the summit without rock climbing equipment. Since 1919, relatively few people have fallen and died on the cables. However, injuries are not uncommon for those acting irresponsibly.
The Half Dome cables usually go back up the Friday before the last Monday in May (Memorial Day) and come down the day after the second Monday in October (Columbus Day). These dates are subject to change based on conditions.
Tips while using the cables:
Take your time and be patient with slower hikers
Allow faster hikers to pass you (when possible)
Remain on the inside of the cables
Do not attempt the ascent if:
Storm clouds are in the area
The ground is wet (the cables and rock become very slick when wet; most accidents on the cables occur during wet conditions)
The cables are down for the winter (typically, from the day after Columbus Day until Memorial Day weekend) (check conditions update for status and any available updates)
Preparation
Footwear
Bring well broken-in boots with good ankle support and good traction. Some of the most common injuries Half Dome hikers suffer are blisters and ankle injuries; good footwear is the best way to prevent these problems.
Gloves
Many people find gloves helpful on the cables. However, if you bring your gloves up, pack them out. Hundreds of pounds of rotting gloves otherwise accumulate.
Trash
There is no trash service on trails. While hiking in Yosemite, be sure to pack out all trash. When possible, you can help park rangers by picking up trash that you encounter on the trail. Bearproof trash cans are available at trailheads.
Water
One of the easiest ways to ensure a safe, enjoyable hike is to be sure to have plenty of water. Weather conditions and personal preference affect the amount of water you need, but suggested minimum amounts per person are:
1 gallon (4 liters) if hiking to the top of Half Dome
2 quarts (2 liters) if hiking only to the top of Nevada Fall
1 quart (1 liter) if hiking only to the top of Vernal Fall
The only treated water on the trail is available (summer only) at a drinking fountain at the Vernal Fall Footbridge (less than a mile from the trailhead). Merced River water is available up to Little Yosemite Valley, however you should treat this water by boiling, using iodine, or using a giardia-rated water filter. Drinking untreated river water may cause significant illness.
Restrooms
Flush toilets are available at the Vernal Fall Footbridge (below Vernal Fall). Composting toilets are available near Emerald Pool (above Vernal Fall), near the top of Nevada Fall, and in Little Yosemite Valley.
At any other location, you are required to bury any solid human waste at least six inches (15 cm) deep and at least 100 feet (30 m) from water or trails. Pack out toilet paper.
Safety
Weather
The summit of Half Dome is a dangerous place during a lightning storm. Check the weather forecast before your hike and try to reach the summit early in the day to avoid thunderstorms, which are more common in the afternoon (but can occur at any time). If a storm appears nearby, do not continue to the summit and, if in the summit area, leave the area (while still using caution when descending the cables and steps).
The summit is typically 15°F (8°C) to 20°F (11°C) cooler than Yosemite Valley and windy conditions are common. Be prepared for cool temperatures and rain showers.
Altitude Sickness
A few visitors each summer have problems with altitude sickness. Symptoms may include severe headache and/or nausea. The only way to relieve altitude sickness is to descend immediately. Other environmental illnesses include heat exhaustion, dehydration, and hyponatremia (low electrolyte levels). In addition to drinking plenty of water, be sure to eat, and to take regular rest breaks in the shade.
Emerald Pool
Entering Emerald Pool and the Silver Apron is prohibited, and entering pools above waterfalls is strongly discouraged, because of frequent injuries and fatalities. Use extreme caution near flowing water; rocks adjacent to streams can be surprisingly slick.
Emergencies
Even if you plan properly and bring the correct equipment, you might still encounter problems. Some cell phones have coverage from Half Dome and from some locations on the trail. Little Yosemite Valley Ranger Station is staffed during summer. You can find the ranger station on the north side of the valley, near where the Half Dome Trail begins to climb out of the valley. Park rangers frequently patrol the trail, so the ranger station is not always staffed. You may need to send some members of your group to Yosemite Valley to get assistance.
Wildlife
Black bears frequent Yosemite's Wilderness and are adept at grabbing backpacks from hikers and campers--during both day and night. Always keep your food within arm's reach (or on your back); never leave it unattended. If you see a bear, act immediately to scare it away: make as much noise as possible by yelling. If there is more than one person, stand together to present a more intimidating figure, but do not surround the bear.
Squirrels, Steller's jays, chipmunks, and other animals also live along the trail; never feed them or allow them to get your food. Do not leave your pack unattended (e.g., at the base of the cables or while you take a swim or nap). Keep wildlife wild: respect them from a distance.
Improper food storage and feeding of wildlife may result in a fine (up to $5,000).
Trailhead and Parking Information
Most people begin the hike from Happy Isles (shuttle stop #16), which is about a half-mile from the trailhead parking lot or about 3/4 of a mile from Curry Village (parking available). Trailhead parking is just beyond Curry Village.
Shuttle service doesn't begin until 7 am, so if you're arriving prior to then, you can walk on the road (closed to all but authorized vehicles) from either parking area to the trailhead.
The nearest campgrounds are Upper, Lower, and North Pines Campgrounds, but reservations are very difficult to get in summer. Camp 4 walk-in campground is also busy. The nearest campgrounds outside Yosemite Valley that may have some first-come, first-served space are Bridalveil Creek and Tamarack Flat Campgrounds.
Porady dla podróżnych
Zarezerwuj, zanim wyruszysz
Park closures
Confirm the current conditions in the parks, road closures, reservations before planning your trip.
Note:
* Yosemite is open with some services limited due to COVID-19
* Winter Road Closures - Tioga Road (Highway 120 through the park) and Glacier Point Road are closed for the season due to snow. Tioga Road usually opens in late May or June. Check current road conditions and chain restrictions by calling 209/372-0200 (press 1, then 1)
Road Conditions are also available here: https://www.nps.gov/yose/planyourvisit/conditions.htm